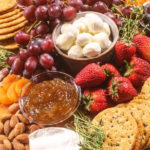


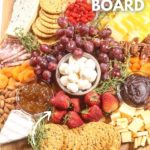


This Easy Charcuterie Board is the perfect party appetizer, a delightful snack, or even a fun, customizable meal. I love that I can just grab a few cheeses, some cured meats, and whatever fruits and crackers I have on hand. Suddenly I’ve got this beautiful, impressive spread. Plus, it’s so fun to see people nibbling and creating their own little flavor combinations.
If you need some other fun ideas, try my festive, holiday charcuterie board and my antipasto skewers. They are perfect for parties or fun snacks.

SAVE THIS RECIPE!
Enter your email below and we’ll send this recipe straight to your inbox.
Why this Simple Charcuterie Board Recipe is a Keeper
A charcuterie board is a visually appealing and delicious appetizer or snack, perfect for gatherings of any size. This post should provide everything you need to know for a tried and true party favorite.
- 30 Minutes: It takes less than 30 minutes to make an easy appetizer.
- Easy Ingredients: To make an easy charcuterie board it takes simple ingredients arranged in an interesting manner.
- Adaptable: With a few simple swaps, you can make the perfect appetizer. Some charcuterie board ideas are low-carb, meat free, dairy free. Make a charcuterie cheese board or charcuterie board meats. Then add fruit and nuts.
- Makes Great Leftovers: The leftovers are just as good! You can easily morph this into…. (give a suggestion).
- Delicious Flavor: The dish tastes amazing and is a hit every time.
- Consistent Results: The recipe turns out well every time you make it.
- Beginner Charcuterie: It’s approachable for beginners, learn how to make a beautiful board with these easy charcuterie board ideas.
- Versatile: The recipe can be easily adapted to making a cheese board or just a snack board.
- Healthy: You can make a simple charcuterie board for beginners. Go to a store like trader joe’s and pick a serving board and fill in the board.
- Can Feed a Crowd with this Sweet and Savory Snack: It can easily be scaled up to feed a large group, making it perfect for gatherings. Chose the board first so that you can design your board for the party size. Make sure you have something savory that pairs well with something sweet. You want things that pairs well together.
What does the term “charcuterie” mean?

“Charcuterie” (pronounced “shar-koo-tuh-ree”) originated in France. The term refers to the art of preparing and arranging cured meats and meat products. It often includes other items like cheeses, crackers, fruits, nuts, and dips, all artfully presented on a platter or board. While the word itself focuses on the meats, a modern charcuterie board is more of a balanced and visually appealing spread of various complementary flavors and textures.
Ingredient Notes for this Meat and Cheese Board
While meat and cheese are staples for these trays, you need to add some other things of interest such as jam, cucumbers, pickles or olives. You want to make sure you have interest around the board.

- Cheese: You want a nice variety of cheese. Cheddar, gouda, goat cheese and spreads such as brie or cream cheese spreads.
- Type of Meat: Salami is a popular choice but you can use summer sausage, prosciutto and ham.
See the recipe card below for a complete list of the ingredients with measurements.
Prep Ahead Suggestions for this Appetizer Recipe
Cut your cheese and meats in advance. Cut the cheese in shapes that will fit your crackers. You can choose your board, crackers and nuts in advance too.
- Prepare and cut your different types of cheeses and meats ahead of time and store in airtight containers. Even use fun cookie cutters to cut out soft cheese for a Christmas Charcuterie Board.
Special Equipment Needed for this Popular Recipe
- Cutting Board: Include at least 1 full sentence why you need this.
- Charcuterie Accessories: Include at least 1 full sentence why you need this.
Pro Tip for this Cracker and Cheese Spread
Add height: Include something with height to add dimension to your cheeseboard. Use small cake stands, bowls of different heights or piles of fruit, cheese or crackers.
How to Make A Charcuterie Board
These are the basic steps for making basic charcuterie board. Refer to the full, printable recipe card below for detailed instructions.
1. Cheese and Meats
First, add the cheese to the board. Next, arrange your meats. Then add your fruits. A mixture of fresh fruit and dried fruits.
2. In Bowls
Next, add your sauces or jams to small bowls. Then add your crackers and breads and finally fill in the gaps with nuts or decorative elements.
How to Store, Reheat and Use Leftover for this Simple Cheese Platter
- Storing: Separate Components:
- Crackers and Baguettes: These will get soggy in the fridge. Store them separately in airtight containers or bags at room temperature. You can store nuts such as pistachios or pretzels, too to keep them crisp.
- Fruits and Vegetables: These can wilt or dry out. Store them separately in airtight containers in the fridge. Add them to the board just before serving for the best freshness.
- Cheeses: Wrap them loosely in parchment paper or wax paper to prevent them from drying out and absorbing odors in the fridge. Soft Cheese such as brie should be stored in an airtight container.
- Meats: These are generally safe to refrigerate, but don’t overlap salami slices too tightly. You can wrap them in parchment paper or store them in an airtight container.
- Dips and Spreads: Store these in airtight containers to prevent them from drying out or absorbing flavors in the fridge.
- Using Leftovers: The options for using leftovers is endless, use in pasta, frittatas, soups and sandwiches.
Variations and Substitution for Easy Appetizer Board Ideas
- Mediterranean Board: Focus on olives, feta cheese, hummus, pita bread, and grilled vegetables.
- Italian Board: Include prosciutto, salami, mozzarella, parmesan, artichoke hearts, and olives.
- Dessert Board: Feature chocolate, fruit, cookies, marshmallows, and a variety of sweet dips.
- Breakfast Board: Offer mini pancakes, waffles, fruit, yogurt, granola, and honey.
- Vegan Board: Include vegan cheeses, dips, crackers, nuts, seeds, and a variety of fruits and vegetables.
Perfect Charcuterie Board Recipe FAQs
A good rule of thumb for charcuterie is to aim for about 2-3 ounces (55-85 grams) of total charcuterie per person. This includes everything on the board – meats, cheeses, fruits, nuts, etc. You want pops of color and items that are easy to pick.
You can select a board of wood such as bamboo, slate, or marble. The size of the board is important too. Consider the number of people you’ll be serving and the amount of food you want to display. A good starting point is a board that’s at least 18 inches long.
A charcuterie board, should not sit out at room temperature for more than two hours. This is especially important for meats, cheeses, and other dairy products
Place larger items like bowls of dips, clusters of cheese, or groups of fruit at strategic points on the board. These will act as your anchors and create visual balance. Think of them as the “corners” of your design, even if your board isn’t square.

Expert Tips to Make a Simple Charcuterie Board
- Focus on quality: Choose high-quality ingredients, even if it means fewer items overall. The difference in taste will be noticeable.
- Consider dietary restrictions: Offer vegetarian or vegan options if needed. Hummus, roasted vegetables, and fruit are great additions.
- Don’t overcrowd: Leave some space between items so guests can easily see and access everything.
- Provide tools: Include small forks, cheese knives, spreaders, and toothpicks for easy serving.
- Garnishes matter: Fresh herbs, edible flowers, or a sprinkle of flaky sea salt can elevate the presentation.
- Serve with: Ranch Spicy Crackers, Glazed Bacon Crackers and Baked Ricotta Dip.

Easy Charcuterie Board
Video
SAVE THIS RECIPE!
Ingredients
CHEESES (select 4-5 varieties for 1-2 ounces total per person)
- Mozzarella
- Brie
- Camembert
- Goat Cheese
- Monterey Jack
- Colby
- Cheddar
- Swiss
- Stilton
- Bleu
- Gorgonzola
- Muenster
MEATS (select 2-3 varieties for 1-2 ounces total per person)
- Soppressata
- Salami
- Prosciutto
- Ham
- Smoked sausage or kielbasa
OTHER INGREDIENTS
- Crackers or baguette, 2-3 varieties
- Fresh vegetables and fruits
- Dried fruits
- Nuts
- Olives
- Pickles
- Jams
- Mustard
- Honey
- Fresh herbs
Instructions
- Begin by arranging the cheese on the board. I usually try to have one in each corner. Then arrange your meat selections.
- Add fresh fruits and vegetables and dried fruits.
- Next, add small bowls of jams, mustards, honey, etc.
- Add crackers and breads.
- Fill in the gaps with nuts and fresh herbs.
Christina’s Notes
-
- Focus on quality: Choose high-quality ingredients, even if it means fewer items overall. The difference in taste will be noticeable.
- Consider dietary restrictions: Offer vegetarian or vegan options if needed. Hummus, roasted vegetables, and fruit are great additions.
- Don’t overcrowd: Leave some space between items so guests can easily see and access everything.
- Provide tools: Include small forks, cheese knives, spreaders, and toothpicks for easy serving.
- Garnishes matter: Fresh herbs, edible flowers, or a sprinkle of flaky sea salt can elevate the presentation.
- Scale the recipe: Simply adjust the serving size in the recipe card and the ingredients will update automatically.
- Make your own All Purpose Seasoning: When a recipe calls for All Purpose Seasoning, you can use my homemade All Purpose Seasoning recipe or substitute salt and pepper to taste.
- Meat doneness: I always use a meat thermometer to test for doneness when cooking meat.
- Use unsalted butter: I use unsalted butter so I can control the salt level in the recipe.
- Preheat the oven: Unless otherwise noted, always preheat your oven before baking.
For more helpful information about this recipe, such as variations, substitutions and other pro-tips, check out the blog post.
I really liked these tips! Texture is just as important as flavor for me, so I agree that it is something to really pay attention to. Your cheese board is beautiful and well balanced. Thanks for all the information. I can use it for building my own charcuterie board on Easter.
loved how everything was displayed
This cheeseboard looks absolutely amazing! I can’t believe how quickly and easily it comes together. You really went into detail giving people like me hope that it can be accomplished.
Thank you for your kind words!
Love a good cheese board! Always something delicious for everyone to enjoy! 🙂
it’s one of my all-time faves!
Nothing beats a good cheeseboard! I love how you’ve included all tips and tricks!
Cheese boards are my go-to appetizer! Simple, but so pretty and always a hit!