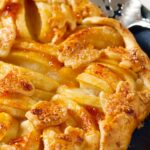


This Rustic Apple Tart is a simple fall dessert with a beautiful presentation. Spiced fresh apples are combined with brown sugar and cinnamon and baked into a golden brown crust in this deceptively simple recipe.

SAVE THIS RECIPE!
Enter your email below and we’ll send this recipe straight to your inbox.
Why this Rustic Apple Tart Recipe is a Keeper
This easy apple pie without the pan has a warm, rustic flavor. The apples are tender, and are spiced with cinnamon and sugar. Serve warm or at room temperature at your next party or gathering. Here are a few reasons why you’ll want to make this easy rustic free-form apple tart:
- Simple Ingredients: All of the ingredients for this apple rustic pie can be found in your kitchen or local grocery store.
- Special Occasion Worthy: This apple pie tart is great for Thanksgiving or fall get-togethers.
- Comforting: This apple pie tartlet features the warm, comforting flavors of cinnamon and baked apples.
- Impressive Presentation: Despite being a simple recipe, this delicious rustic apple tart looks beautiful as part of a spread.
What Apples are Best for Baking this Tart?

Like many apple tart recipes, apples like Granny Smith are recommended here. While you can use any type of apple for this recipe, Granny Smith apple slices hold up well when baked. They have a tart flavor, which is complemented well by the spices in this recipe. Avoid using apples that are too soft, like Golden Delicious.
Ingredient Notes to Make Apple Tarts

- Flour: Make this recipe with all purpose flour. Save 1 tablespoon of flour to make the filling.
- Butter: Use two tablespoons of melted butter to keep the dough from being crumbly. Make sure not to use cold butter.
- Shortening: Mix together shortening and butter to make the flaky pie crust.
- Apples: Peel, core, and slice four apples.
See the recipe card below for a complete list of the ingredients with measurements.
Prep Ahead Suggestions for Apple Tart without a Pie Plate
- Crust: Make the crust up to 3 days in advance and store in the fridge.
- Oven: Preheat the oven to 400° before you bake the tart.
Pro Tip for this Apple Galette
Don’t overfill the tart. If the tart is too full, the filling may run out during baking.
How to Make Rustic Apple Pie Tarts Without a Pie Pan
These are the basic steps for making apple galette. Refer to the full, printable recipe card below for detailed instructions.
1. Make the Crust
Line a baking sheet with parchment paper. Combine flour, butter, shortening and salt in a food processor. Slowly drizzle in ice water, then blend in the food processor until the dough comes together. Divide the dough into two parts. Transfer the dough to the refrigerator and refrigerate for 30 minutes. Preheat the oven to 400°f.
2. Make Apple Filling Mixture
Mix the flour, sliced apples, cinnamon, nutmeg, brown sugar, and salt in a large bowl. Stir well. Shape the pie dough into a disk. Roll out the dough with a rolling pin to about 10 inches in diameter, then transfer onto a baking sheet lined with parchment paper or a lightly floured surface.
3. Fill the Tart on Work Surface
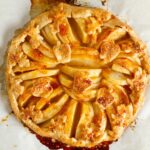
Pour apple mixture into middle of pastry, leaving about 1 inch around the entire circle. Fold up the edges and brush with melted butter. Transfer to the oven and bake until crust is golden brown and the apples have softened, or for 25-30 minutes. Bake for a few extra minutes if undercooked. Transfer the tart onto wire rack and let cool slightly before removing from the parchment-lined baking sheet. Serve warm.
How to Store, Reheat and Use Leftover Rustic Apple Bake
- Storing: Store leftover apple tart in an airtight container in the refrigerator. You can also wrap in plastic wrap.
- Reheating: Reheat in the microwave until warmed through.
- Using Leftovers: Eat leftover apple pie tart up to 2 days after baking.
Apple Tart Recipe Variations and Substitutions
- Crust: If you’re short on time, use a storebought crust.
- Cranberries: Add some walnuts or cranberries to the tart.
- Tartlets: Make individual tarts so everyone can enjoy their own.
Rustic Apple Tart Recipe FAQs
Serve this recipe with pecan pie tarts, homemade apple fritters, or cinnamon cupcakes with maple frosting.
The apple slices should be between 1/4 and 1/2 inch thick.
Peel the apples before baking the tart.

Expert Tips for Making This Recipe
- Add Apricot Jam: Brush the top of your tart with apricot preserves or egg wash to achieve a glossy glaze finish to your tart.
- Variation tip: Add a few peach slices or blueberries to your apple tart.
- Flour: If you’re baking on the counter, flour your work surface when you roll the dough to prevent it from sticking.
- Alternate ingredient: Sprinkle the top of your rustic apple tart with a little sugar for a sweet finish, then crimp the edge of crust.
- Alternate cooking method tip: Cook in the air fryer at 350 degrees for roughly ten minutes.
- Sauce: Drizzle with a little caramel sauce.
- Variety: Use a variety of apples for the best flavor.

Rustic Apple Tart
Equipment
- Pastry Brush
SAVE THIS RECIPE!
Ingredients
Crust Ingredients
- 3 cups Flour
- 12 tablespoon Cold Butter
- ½ cup Shortening
- 1 teaspoon Salt
- ⅓ cup Ice Water
Filling
- 4 Apples, peeled, cored and sliced
- 3 tablespoons Brown Sugar
- 1 tablespoon Flour
- ¼ teaspoon Cinnamon
- ⅛ teaspoon Nutmeg
- pinch Salt
- 2 tablespoons Butter, melted
Instructions
- Combine flour, butter, shortening and salt in a food processor.
- Slowly drizzle in ice water.
- Pulse in food processor until dough forms a ball.
- Remove dough from processor, divide into two equal parts and wrap each in plastic wrap.
- Refrigerate for at least 30 minutes.
- Apple Filling Ingredients:
- Combine apples, brown sugar, flour, cinnamon, nutmeg and salt in a large bowl. Stir to combine.
- Roll out one disc of refrigerated pastry to about 10″ in diameter. It doesn’t have to be perfect. In fact, imperfections make it more rustic.
- Transfer pastry to a parchment lined baking sheet.
- Pour apple mixture into middle of pastry, leaving about 1 inch around the entire circle.
- Fold up the edges around the filling.
- Brush edge of pastry and filling with melted butter.
- Bake at 400 degrees for 25-30 minutes, or until crust is golden brown and apples have softened.
- Allow tart to cool slightly before removing from baking sheet.
Christina’s Notes
- Add Apricot Jam: Brush the top of your tart with apricot preserves or egg wash to achieve a glossy glaze finish to your tart.
- Variation tip: Add a few peach slices or blueberries to your apple tart.
- Flour: If you’re baking on the counter, flour your work surface when you roll the dough to prevent it from sticking.
- Alternate ingredient: Sprinkle the top of your tart with a little sugar for a sweet finish, then crimp the edge of crust.
- Alternate cooking method tip: Cook in the air fryer at 350 degrees for roughly ten minutes.
- Sauce: Drizzle with a little caramel sauce.
- Variety: Use a variety of apples for the best flavor.
- Scale the recipe: Simply adjust the serving size in the recipe card and the ingredients will update automatically.
- Make your own All Purpose Seasoning: When a recipe calls for All Purpose Seasoning, you can use my homemade All Purpose Seasoning recipe or substitute salt and pepper to taste.
- Meat doneness: I always use a meat thermometer to test for doneness when cooking meat.
- Use unsalted butter: I use unsalted butter so I can control the salt level in the recipe.
- Preheat the oven: Unless otherwise noted, always preheat your oven before baking.
For more helpful information about this recipe, such as variations, substitutions and other pro-tips, check out the blog post.
I made this & it’s a keeper for my recipes, absolutely delish & easy to make.
Thank you, Christina!
I was a little confused because we made two pastry and only used one.
I used all 4 apples on one pastry, added a handful of blueberries and drizzled a apricot peach fruit spread. Cooked for about 35 minutes at 400degrees. It was great! But was I supposed to make two tarts? 😆
You can or you can use it to make decorative cut outs for the top of the tart.
This looks like a great idea for a dessert to take to my MILs on Mother’s Day!