


My Air Fryer Garlic Bread is a game changer. Garlic bread has always been a favorite in our house, but I used to avoid making it because turning on the oven felt like too much effort for a side dish.
Once I tried it in the air fryer, everything changed. It’s fast, crispy, and just as buttery and garlicky as the oven version—without heating up the whole kitchen. Now it’s my go-to for pasta night or when I just want something warm and comforting in minutes.
I love coming up with more ways to make bread in my air fryer. Such as: my native american fry bread recipe and my garlic naan bread.

SAVE THIS RECIPE!
Enter your email below and we’ll send this recipe straight to your inbox.
Why this Air Fryer Garlic Bread Recipe is a Keeper
I love this recipe because it’s quick, super easy and, not to mention, delicious. This homemade garlic bread in air fryer side dish goes perfect with almost anything you can think of.
- Speed and Efficiency: This is its biggest selling point. Forget preheating a large oven; your air fryer gets hot in minutes, delivering perfectly toasted garlic bread in a fraction of the time.
- Perfect Texture: The air fryer excels at creating a crispy exterior while keeping the inside soft and warm. You get that satisfying crunch without drying out the bread for this easy side dish.
- Less Heat in the Kitchen: Especially in warmer months, using an air fryer instead of a full oven helps keep your kitchen cooler when making homemade air fryer garlic bread.
- Minimal Cleanup: Often, you can line your air fryer basket with parchment paper or foil for even easier cleanup, or simply wipe down the basket.
- Consistently Delicious: Once you nail the time and temperature for your specific air fryer, you’ll get consistently perfect garlic bread every time.
Can I Cook Frozen Garlic Bread in the Air Fryer?

Yes. Air fry frozen garlic bread for about 5 minutes at 350 °F.
Fun Fact for this Air Fryer Recipe
Garlic Bread is actually an American Invention not a Italian one.
Ingredient Notes to Make Garlic Bread
To make this recipe, there are just a few easy ingredients that are needed. They can all be found in the kitchen, at the store or can be substituted.
Get the full printable recipe with specific measurements and directions in the recipe card below.

- Bread: The recipe calls for Italian bread. However, you can try anything from Texas toast to sourdough.
- Dried Parsley: Parsley is used for garnish, but you could also try Italian Seasoning.
- Garlic: You can use either garlic powder or fresh garlic to make this the garlic butter for this homemade garlic bread recipe.
- Italian Cheese: Use an Italian cheese like mozzarella or grated parmesan cheese to make your cheesy garlic bread.
Variations and Substitutions to Make Garlic Butter Toast
Easily customize this easy garlic bread recipe. I like to take it to the next level by using different ingredients to try different flavors.
- Cheese Please: Add a layer of shredded mozzarella, Parmesan, provolone, or a blend of Italian cheeses during the last 1-2 minutes of cooking. Sprinkle extra grated Parmesan directly onto the garlic butter before cooking for a crispier, cheesier crust.
- Fresh Herbs: Incorporate finely chopped fresh parsley, chives, basil, or oregano into your garlic butter for brighter flavor.
- Dried Herbs: Use dried oregano or basil if fresh herbs aren’t available.
- Spice It Up: Add a pinch or two of red pepper flakes to the garlic butter for a subtle kick. A tiny dash of cayenne can add warmth without overwhelming the garlic.
- Bread Options: There are so many different breads you could try.
- French or Italian Bread: Classic choices, sliced thick.
- Baguette: Perfect for smaller, individual servings.
- Ciabatta Rolls: Slice them in half for a rustic garlic bread.
- Gluten-Free Bread: Works just as well; adjust cooking time as needed, as GF bread can sometimes toast faster.
- Garlic Intensity: Use roasted garlic mashed into the butter for a sweeter, milder garlic flavor.
- Vegan Butter: Many excellent plant-based butter alternatives work perfectly.
Special Equipment Needed to Make the Cheesy Garlic Toast
Sometimes a recipe can be made much faster when using the right piece of kitchen equipment.
- Air Fryer: An air fryer will quickly make this recipe for bread that’s super crispy.
How to Make Air Fryer Garlic Bread
This recipe comes together in just 3 easy to follow steps. This buttery garlic bread is so good, it’s usually in my weekly meal rotation.
Get the full printable recipe with specific measurements and directions in the recipe card below.

- Preheat Air Fryer and Slice Bread: Preheat the air fryer and slice the loaf of bread into one inch slices.
- Season the Bread: Brush both sides of each piece of bread with the melted butter, and top with garlic powder.
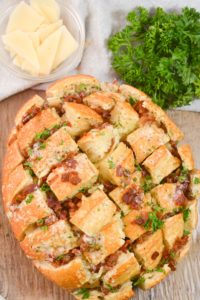
- Air Fry Garlic Bread: Add each slice to the air fryer basket and cook for a few minutes. Flip each piece, add the shredded cheese and cook for a couple minutes more. Garnish with dried parsley.
Prep Ahead Suggestions for Easy Air Fryer Garlic Bread
I like to prepare ingredients ahead of time so that I don’t have to do all of the steps at once when I’m making dinner.
- Make the Garlic Butter Ahead: Prepare your garlic butter mixture (softened butter, minced garlic, herbs, salt, pepper) up to 3-4 days in advance. Store it in an airtight container in the refrigerator.
- Portion and Freeze: For longer storage, spoon the garlic butter onto a sheet of parchment paper, roll it into a log, and freeze. Once solid, slice into rounds and store the rounds in a freezer-safe bag or container for up to 2-3 months. You can then just grab a slice for each piece of bread.
How to Store, Reheat and Use Leftovers of the Air Fry Garlic Bread
- Storing: Refrigerate leftover garlic bread as soon as possible in airtight containers. This easy side is good for 3-4 days in the fridge.
- Reheating: For the best texture, reheat in the air fryer. Place garlic bread in a single layer and air fry for 3-5 minutes, flipping halfway.
- Using Leftovers: Turn the best garlic bread leftovers into other dishes including:
- Savory Bread Pudding/Strata: Tear into pieces and layer with eggs, cheese, vegetables, and leftover cooked meats for a comforting baked dish.
- Panzanella Salad: Combine cubed garlic bread with fresh tomatoes, cucumbers, red onion, basil, and a vinaigrette for a rustic bread salad.
- Pizza Base: Top with a little pizza sauce, cheese, and your favorite toppings, then air fry or bake for quick personal pizzas.
- Soup Dippers: Perfect for dipping into tomato soup, chili, or a hearty stew.
- Grilled Cheese/Sandwiches: Use the garlic bread slices as the “bread” for a unique grilled cheese or open-faced sandwich.
- Meatball or Sausage Subs: Split lengthwise and fill with warmed meatballs and marinara, or cooked sausage and peppers.
Common Questions About This Air Fryer Side Recipe
Yes, preheating helps ensure even cooking of this simple recipe.
A little trick to keeping bread from drying out is to very lightly mist the bread with water before putting it in the air fryer.
If your garlic is burning, the air fryer is probably too hot. I like to use garlic powder because it take a lot to burn it.

Expert Recipe Tips for the Best Air Fryer Garlic Bread
- Melted Butter is Key: Ensure your butter is properly melted. This makes it easier to spread the garlic butter and to mix in the garlic and herbs.
- Don’t Overcrowd: Air needs to circulate around each piece for even cooking and crisping. Cook in batches if necessary.
- Cut Evenly: Slice your bread to a consistent thickness so all pieces cook at the same rate.
- Flip for Evenness: While not always necessary, flipping the garlic bread halfway through cooking can promote more even browning, especially for thicker slices.
- Serve With: Serve with Tomato Basil Bisque, Garlic Herb Butter or Creamy Tuscan Shrimp Pasta.
More Recipes You Might Like


SAVE THIS RECIPE!
Enter your email below and we’ll send this recipe straight to your inbox.

Air Fryer Garlic Bread
Equipment
SAVE THIS RECIPE!
Ingredients
- 1 Loaf Italian bread
- ½ cup Butter, melted
- 1 tablespoon Garlic powder
- 1 cup Shredded Italian blend cheese
- ¼ teaspoon Dried parsley, garnish
Instructions
- Preheat the air fryer to 350℉.
- Cut the loaf of bread into one-inch slices.
- Brush both sides of each slice of bread with melted butter and top with garlic powder.
- Place the bread slices in the tray or basket of the air fryer.
- Cook for 4 minutes, then remove the tray or basket and flip the slices. Top each slice with a small amount of shredded cheese and cook an additional 2 minutes.
- Garnish with dried parsley before serving.
Christina’s Notes
- Preheat matters: A hot air fryer helps deliver an evenly golden crunch.
- Choose the right bread: French or Italian loaves hold up well and crisp beautifully.
- Watch the timing: Air fryers vary—start checking at 5 minutes.
- Go cheesy: Add shredded mozzarella or Parm in the last 2 minutes.
- Scale the recipe: Simply adjust the serving size in the recipe card and the ingredients will update automatically.
- Make your own All Purpose Seasoning: When a recipe calls for All Purpose Seasoning, you can use my homemade All Purpose Seasoning recipe or substitute salt and pepper to taste.
- Meat doneness: I always use a meat thermometer to test for doneness when cooking meat.
- Use unsalted butter: I use unsalted butter so I can control the salt level in the recipe.
- Preheat the oven: Unless otherwise noted, always preheat your oven before baking.
For more helpful information about this recipe, such as variations, substitutions and other pro-tips, check out the blog post.