


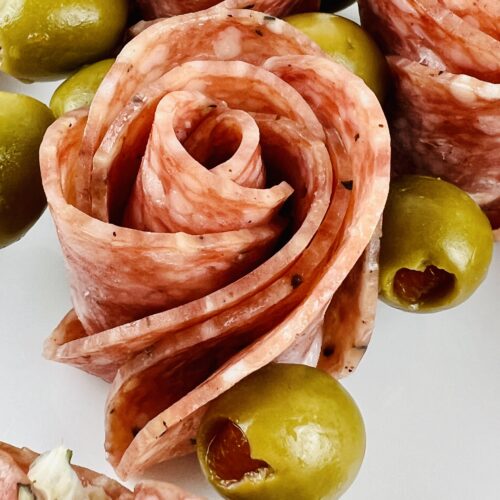
This How to Make Salami Roses tutorial is the easiest way to level up your charcuterie board presentation. The roses are made in 2 steps, so they’re not as intimidating as they seem.
Entertaining doesn’t have to be complicated. A charcuterie board is such a favorite. Try my Charcuterie Cheese Board or my Charcuterie Skewers for your next gathering.

SAVE THIS RECIPE!
Enter your email below and we’ll send this recipe straight to your inbox.
How to Make Salami Rose Recipe is a Keeper
I love this how to make salami rose recipe because it’s the perfect addition for your Christmas charcuterie board, or just to have as a fun snack.
- Quick & Easy: Salami roses are easy and are done in minutes. Plus, they take just a few slices of salami to make each rose petals. You can also make using a glass.
- Wow Factor: A beautiful salami rose instantly elevates any charcuterie board or grazing board. So you have to learn how to make them.
- Beginner Friendly: Foolproof method anyone can follow. Make different size roses, you can slice of salami in half for cute little roses.
- Serve With: Serve this smaller flower recipe on a Christmas Day Charcuterie Board with fresh fruit and crackers. You can make larger roses for a small charcuterie board too.
What Kind of Salami Works Best to Make a Salami Rose?

You can use any kind of salami as long as it’s sliced thin enough and isn’t too stiff. It needs to be able to roll to make salami roses for charcuterie boards. Genoa salami is typically a staple for snack boards.
What Reader’s Are Saying…
⭐⭐⭐⭐⭐
“This worked exactly as written, thanks!”
~ Dorothy
Ingredient Notes to Make Salami Roses
All of the required ingredients are easy to find at the store, but some of the ingredients may be around the kitchen already.
This is an overview of key ingredients. Get the full printable recipe with specific measurements and directions in the recipe card below.
- Number of Salami Slices: For one salami rose, you will need 4 slices to make the layers of salami. The total amount of salami you will need depends on how many and what size of the roses you want.
- Olives: Disguise the ends of the toothpicks with olives. You will need two olives per rose to help hold its shape.
Variations and Substitutions to Make a Rose
I will show you how to make a salami rose different ways. I like to take change it up by using different ingredients and trying different flavors.
➡️ Swap Meat: Some other great meat options can include a pepperoni rose, prosciutto, or deli ham.
➡️ Mix Colors: Combine different meats for a layered, unique charcuterie board. This is a great way to make your valentine’s day charcuterie board stand out.
➡️ Add Cheese: Layer thin cheese slices between salami for variation.
➡️ Sizes: The size of the salami flowers with depend on the size of the rose you want.
Kitchen Tools To Make Roses Easier
This snack board favorite doesn’t require anything fancy, but one thing can make it look more appealing.
- Toothpicks: The only thing you’ll need is a toothpick to help press and hold the salami together.
How to Make Roses for a Charcuterie Board
Meat flowers come together in just 2 quick and easy steps. This recipe is so good, it’s a great one to have for enhancing a simple charcuterie board.
These are just highlights. Get the full printable recipe with specific measurements and directions in the recipe card below.

- Prep the Pieces of Salami: Lay 4 pieces of sliced salami out, letting them overlap. Then, fold the bottom half of the first slice of salami line up so they’re folded in half.
- Roll and Secure: Tightly roll the line of salami starting on one side and working towards the other. Secure with a toothpick at the end, you want your rose to stay in place and hide the ends of the toothpick with olives. Place the salami flower onto your board.
Prep Ahead and Short Cut Tips to Make Roses with Salami
Prepping ahead of time can really help to save time and kitchen space if hosting a party.
➡️ Assemble Early: Make beautiful roses ahead of time. Make them a few hours ahead and refrigerate covered until ready.
➡️ Store Covered: Keeps the slices of salami from drying out.
➡️ Batch Prep: Make multiple roses at once for large boards.
Alternate Methods – Make Roses Using A Glass
There are a couple other ways to make deli meat roses if you’re having a hard time rolling them on the counter.
- Use a Shot Glass or Larger Glass: Fold each salami slice around the rim of a glass, overlapping as you go. Some on the inside the glass and some on the outside of the glass. Drape the salami over the edge of the glass. Keep layering until it’s full, then turn the glass upside down to flip it out. Use a smaller glasses like a shot glass make smaller roses, wine glasses or champagne flutes will make large salami roses. Just make sure you drape over the rim of the glass, going all around the glass.
- Use a Muffin Tin: Perfect for making multiple roses at once. Layer folded salami slices around the inside of a muffin cup. Keep overlapping until the center is filled.
- Use a Small Round Cookie Cutter: Great for mini roses. Stand the slices upright around the inside of the cutter. Keep overlapping until the center is tight. Keep in mind, you may find it easier to use small salami pieces to make small petals.
What Else Can I Make Using this Technique For?
This same technique can be used to make other foods into flowers. Cured meats like pepperoni, soppressata, chorizo, or prosciutto work beautifully because they fold and layer the same way salami does. You can also use thin cheese or fruit slices to make flowers.

How to Store and Use Leftover Meat Roses
If you store your leftovers the right way, they can be just as good as they were fresh
- Storing: Keep in airtight container in fridge up to 2 days
- Using Leftovers: Add to sandwiches, wraps, or snack plates
Expert Tips for Making Salami in a Rose Shape
➡️ Even Layers: Overlap slices evenly for a balanced look.
➡️ Don’t Overpack: If you use too many salami slices, you’ll find that it’s hard to flip cleanly.
➡️ Use Thin Slices: Thick slices won’t fold properly.
➡️ Flip Carefully: Hold firmly when inverting to keep shape intact.
➡️ Adjust Shape: Gently fan out slices after removing from a champagne glass for a fuller rose.
We Recommend You Try These


SAVE THIS RECIPE!
Enter your email below and we’ll send this recipe straight to your inbox.
How to Make Salami Roses
Video
Equipment
- Toothpicks
SAVE THIS RECIPE!
Ingredients
- 4 Salami slices
- 2 Green olives
Instructions
- Layout 4 salami slices in a row, overlapping.
- Fold the slices, keeping them together, in half horizontally with the fold facing you.
- Starting from the left side, tightly roll to the other side and secure with a toothpick.
- Place green olives on the exposed ends of the toothpick.
Christina’s Notes
- Mini Mozzarella: If you aren’t a fan of olives, you can also use mini mozzarella balls to secure the toothpicks instead of olives.
- Flower Charcuterie Board: A fun way to make a simple charcuterie board into a unique charcuterie board made with meat roses, you could do a mix of salami flower, mortadela, or capicola would be the best meats to make meat flowers with.
- Snack Boards: Add these salami roses to a snack grazing board along with fresh fruit, nuts, cheese, and crackers. Your kids would love to have individual snack trays.
- Large Salami Rose: For larger roses use a total of 6 slices of salami.
- Use edge of a glass: You can also make salami roses using the rim of a wine glass or a champagne glass or shot glass if you don’t have any wine glasses. Use this salami rose tutorial video.
- Cheeseboard Tips: When arranging a cheese board make sure to leave empty spaces using a glass upside down to save spaces for other ingredients.
- Scale the recipe: Simply adjust the serving size in the recipe card and the ingredients will update automatically.
- Make your own All Purpose Seasoning: When a recipe calls for All Purpose Seasoning, you can use my homemade All Purpose Seasoning recipe or substitute salt and pepper to taste.
- Meat doneness: I always use a meat thermometer to test for doneness when cooking meat.
- Use unsalted butter: I use unsalted butter so I can control the salt level in the recipe.
- Preheat the oven: Unless otherwise noted, always preheat your oven before baking.
For more helpful information about this recipe, such as variations, substitutions and other pro-tips, check out the blog post.
This worked exactly as written, thanks!